
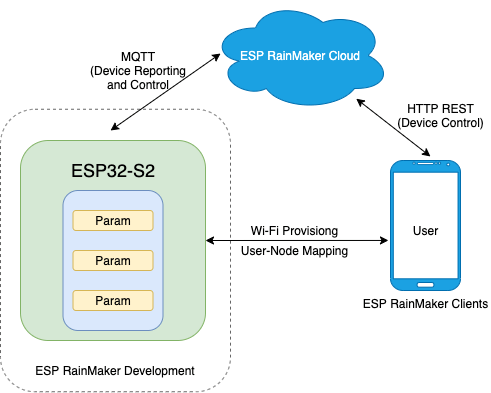
The architectural design of IoT products is crucial for developers, as each layer of the development has to be properly taken care of. Additionally, designing an application-based product limits the scope of the hardware. Hence, Espressif Systems has come up with a solution with ESP RainMaker.
ESP RainMaker is a platform for IoT enthusiasts who want to focus on the firmware of the project. Instead of worrying about the structural communication layers for building an end-to-end use case, it works on a node-based configuration for the implementation of wireless functionalities of the ESP32 boards. The developers can log in as clients via the RainMaker mobile app (available for both iOS and Android). The application can control the hardware through ESP RainMaker Cloud.
Prerequisites Before Getting Started with ESP RainMaker
You need a local machine for installing the dependencies before starting with RainMaker. This tutorial shows the process with Windows, though it can also be set up on Linux and Mac. You will need the following:
- ESP-IDF
- ESP32 Board
- Python Environment *
- Git CLI *
If you already have ESP-IDF set up on your local machine, then Python and Git are by default associated with it. Hence, you only need to worry about the setup of ESP-IDF.
Setting Up ESP RainMaker
Before starting with ESP RainMaker, make sure you already have a main folder on your local machine where the ESP-IDF folder resides. Generally, this main folder is in the C drive but could be at a different location. In this article, the main folder is Desktop, which has an ESP-IDF folder along with its toolchain and dependencies.
Open the CMD tool of the ESP-IDF and set Desktop as the current path of the environment.

Cloning with GitHub Project
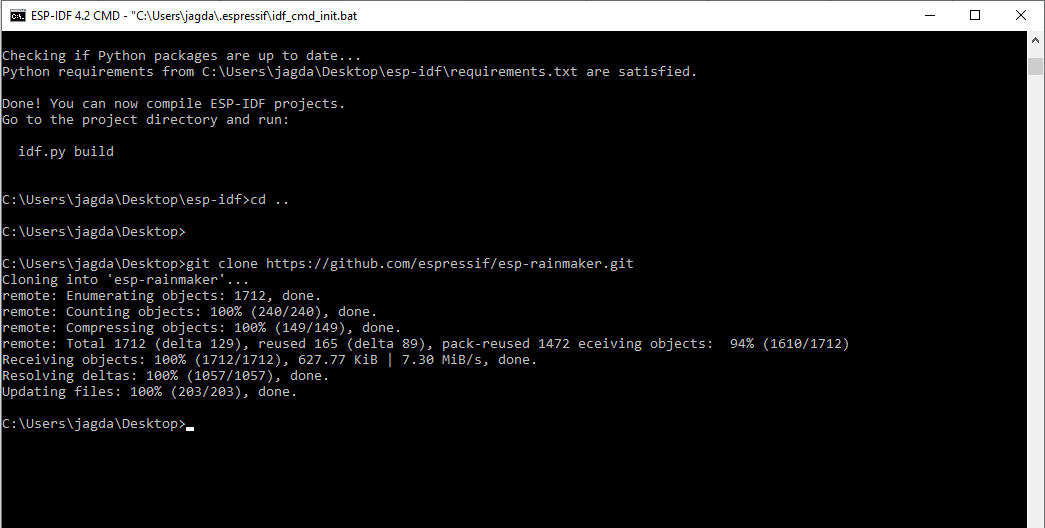
Once the desktop becomes the current path of the ESP-IDF environment, you need to clone the ESP RainMaker project from the GitHub repository. Run the following command on the CMD to clone the GitHub project on your Desktop.
git clone https://github.com/espressif/esp-rainmaker.git
Go to the “esp-rainmaker” directory, then the “cli” folder. If you find the “cli” folder empty, then you need to execute the following command:
git clone --recursive https://github.com/espressif/esp-rainmaker.git
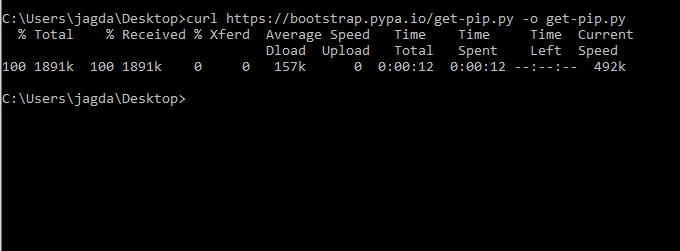
You need to configure the CLI using the Python 3 environment on your Windows local machine. Install the dependencies by executing the following commands on the CMD.
curl https://bootstrap.pypa.io/get-pip.py -o get-pip.py
cd esp-rainmaker
cd cli
You need to install all the Python packages through the ESP-IDF CMD tool. Check if the cli folder has a “requirements.txt” file, then execute the following command for installing packages:
pip install -r requirements.txt
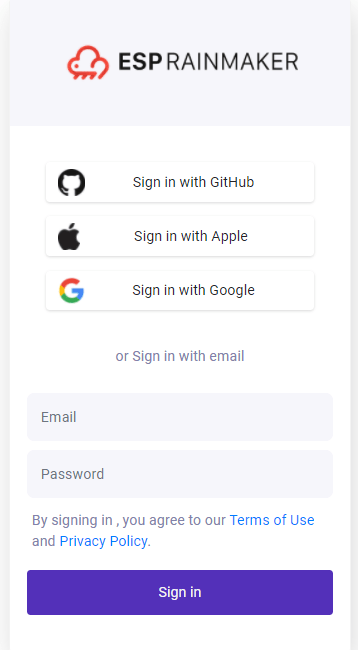
Log in to ESP RainMaker
If everything went well, then all the dependencies for RainMaker will be completed and properly configured on your Windows local machine. Sign up with RainMaker and download the phone application, then create an account. Execute the following command on the CMD once you are done.
python rainmaker.py loginAfter the execution of the command, a webpage will open on your web browser, and you need to register/log in to your RainMaker account.
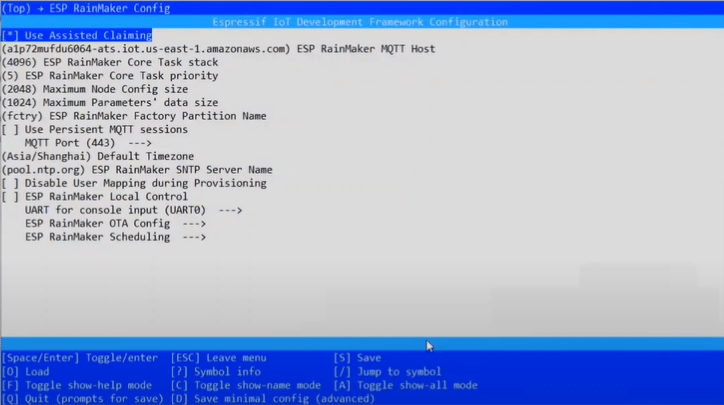
To complete the “assisted claiming” for the ESP32 development board, execute the following command:
idf.py menuconfig
A config menu will open up on the screen to perform assisted claiming. Go to ESP RainMaker Config and select “Use assisted claiming”:
You have successfully configured RainMaker on your local machine. Now, you can start building applications and use cases for your ESP32 development boards via RainMaker.
Get the best of IoT Tech Trends delivered right to your inbox!


