
Removable microcontroller chip? 5V logic support? Your Arduino may be sturdy and repairable, but it also has its limits. Here are five ways to keep yourself from committing robot murder!
1. Never Leave Your Arduino Connected to Your PC While Fixing Your Code
This might come out as a “weird rule” sort of thing, but consider this: how long do you think it takes to figure out why an LED in your project isn’t working? If you’re sure that it’s just the code, can you really find it in 5 minutes or less?
Sometimes, you might end up connecting two input-output (I/O) pins in the same circuit. That’s okay, sometimes. You might also have to connect your Arduino to another device that supplies electricity for logic outputs. And that’s also okay.
What’s not okay is having an output pin set to low while receiving 5V from another source for an extended period of time. This can kill that pin.
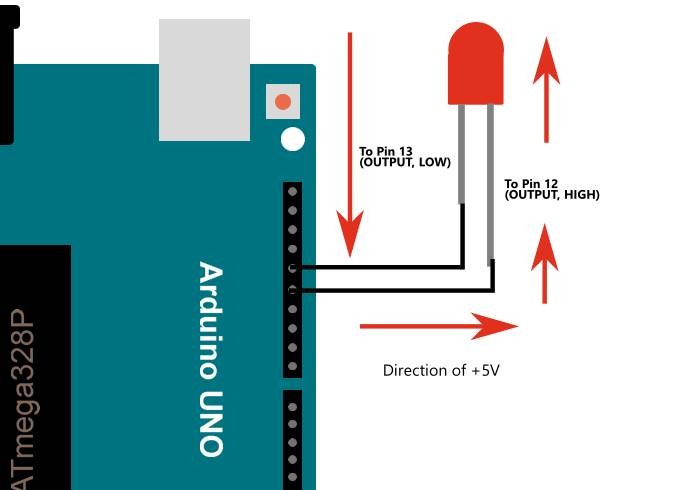
There are three ways to wire your board that could damage the I/O pins this way:
- Connecting two output pins together with one set to high and the other low.
- Passing 5V to a low output pin from another source.
- Powering a DC motor directly with the Arduino’s I/O pins.
If it does break down and you’re lucky, you might just have to replace the removable microcontroller chip. You’ll still need to burn the bootloader into the chip though. And that only works for the Uno. Other boards, like the Nano, Mega, and Leonardo have surface-mounted microcontroller chips. So if you break one of these, you’ll have to say good bye to the whole board.
2. Use a Voltage Regulator
This second tip has something to do with the way you power your Arduino. When you’re not running it off of your computer’s USB port, there are two other ways to power it:
- Through the DC barrel jack, or
- Through the unregulated 5V pin.
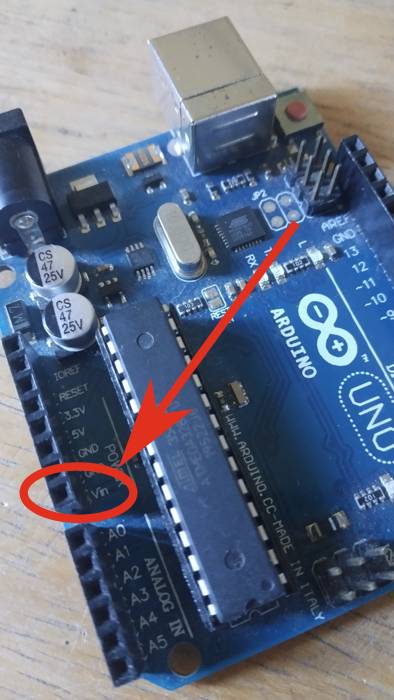
While the DC barrel jack can take a lot of beating, the unregulated 5V pin can’t. You should limit that pin to 5.5V and keep it running at least 5V at all times.
If you are using a breadboard for prototyping, you could use an MB102 breadboard power supply unit to power both your Arduino and its peripherals. Alternatively, you could build your own using an L7805 voltage regulator. However, you will need to learn how to solder before going about with this.
3. NEVER Power a DC Motor Directly on the Arduino’s I/O Pins
With DC motors, there’s a term called an inductive flyback. Other people like to call this a kickback to mean the same thing. It’s when electricity, which is supposed to flow one way, suddenly and quite strongly flows back on the other direction for a little while before returning to its original direction.

Inductive flyback happens when the DC motor experiences a sudden drop in incoming voltage. This happens when you switch the I/O pin to LOW, or while controlling the average voltage strength with pulse-width modulation using the PWM pins.
Unfortunately, there’s no avoiding this with DC motors besides using a protective circuit with a flyback diode. You can construct one using a 1N4004 diode connected in parallel to your DC motor. Alternatively, you can use shields and modules to run a couple of DC motors safely from a separate power source. This lets you provide more current for the DC motors to work with without much of a strain on your Arduino.
4. Be Careful with Electrostatic Discharge (ESD)
While your Arduino can take some slight ESD, too much at the wrong time could possibly ruin the microcontroller chip, just as most other microcontrollers do. And this is not just about random ESDs. There are a ton of ways you could expose yours to ESD without thinking about it.

Normally, all Arduino boards come with some form of ESD protection from the way the boards are built around the microcontroller. But some things like carpets, styrofoam, or even your cat can cause an ESD that it causes some permanent damage to the microcontroller.
Other times, you might notice a sudden change in the floating values. Sensors could go awry. Variables could change. The last thing you’d probably want is wonder why your thermometer suddenly shows 64 degrees instead of 32. Most ESD damage is as tiny as this. But the damage accumulates over time.
The best way to avoid this is by avoiding ESD in the first place. There’s a thing called a Faraday cage that is so good at preventing ESD, it could even block your Wi-Fi signal. And it’s pretty simple to make. You just have to enclose it in metal – any kind of conductive metal. A literal metallic cage made with iron mesh can work, but aluminum tape should do the trick (and help keep it in place).
5. Take a Good Look at Your Enclosure
While we’re talking about protecting from ESD with enclosures made out of metal, here’s something to think about when planning for outdoor projects. Your enclosure might be air-tight and waterproof, but are you sure your Arduino is safe?

For outdoor projects, enclosures typically have to keep your Arduino safe from the elements. Be it water, wind, or falling leaves, fruits, twigs, or squirrels, you have to make sure it’s safe.
Enclosures need to be sturdy enough to keep these at bay. But you also have to look out for condensation. Given enough space, water can form inside the enclosure and damage the electronics. And sunlight can cook up the batteries.
Whether you use an Arduino or another development platform, you should take precaution to make sure your device is well-protected. (Hint: your shoe box has desiccant gel to absorb humidity.)
Frequently Asked Questions
Is it a good idea to run an Arduino off of a power bank?
While can run from a single power bank, the other parts that it’s running might not like it. If, say, you are running a bunch of sensors and an LCD display module to see what they’re measuring, you might have to use an extra power supply or battery to keep them running.
Can magnets ruin my Arduino?
Arduino boards are made to withstand magnetic fields from ruining their microcontroller chips. With that said, you might still notice a change in some functions, like clock speed or capacitor levels, but not to the point that it would cause permanent damage. Plus, most of these problems are not even that noticeable in the average Arduino project.
Can an Arduino withstand falling?
Your average Arduino board, regardless of model, can fare way better than your average smartphone getting dropped from a low height – especially if it’s an original board. The ones made in Italy have great soldering, so the chips won’t come off even if you drop it a lot. You should actually be more careful of smashing the board to bits, instead.
Image credit: Unsplash. Images and diagrams by Terenz Jomar Dela Cruz


