
Are you struggling to create the home automation system of your dreams using just the SmartThings mobile app? Do you know you can take your smart home to the next level by adding webCoRE (web Community’s own Rule Engine) to the mix?
In this article you’ll learn how to create powerful, custom home-automation pistons for your SmartThings network using the powerful webCoRE engine. By the end, you’ll have everything you need to build complex, conditional home-automation workflows that wouldn’t be possible using the Samsung mobile app alone.
What is webCoRE?
WebCoRE is a free, web-based rule engine that you can use to build complex home-automation rules.
WebCoRE rules usually take the form of stacked conditionals, e.g. “If A, then do B and then C, but only while D and never if E.” For example, you may use webCoRE to create a home-automation rule that activates your ceiling fan when the temperature in the living room exceeds 25°C and then deactivates it when the temperature drops below 20°C, or you may create a rule that sends a push notification to your smartphone if it’s after sunset and the garage door is unlocked.
To use webCoRE, you’ll need to:
- Import the webCoRE code into your SmartThings Integrated Development Environment (IDE).
- Add webCoRE to your SmartThings Classic mobile application.
- Use the webCoRE Dashboard to create your first home-automation script, which SmartThings refers to as “pistons.”
How to set up webCoRE: GitHub integration
The easiest way to add webCoRE to your SmartThings account is via GitHub, so this is the method used in this tutorial. If you don’t have a GitHub account, you can create one for free.
1. Log in to the SmartThings IDE.
2. Head over to the Enable Source Code Control page.
3. Read the onscreen information, and if you accept the terms, click “Authorize application.”
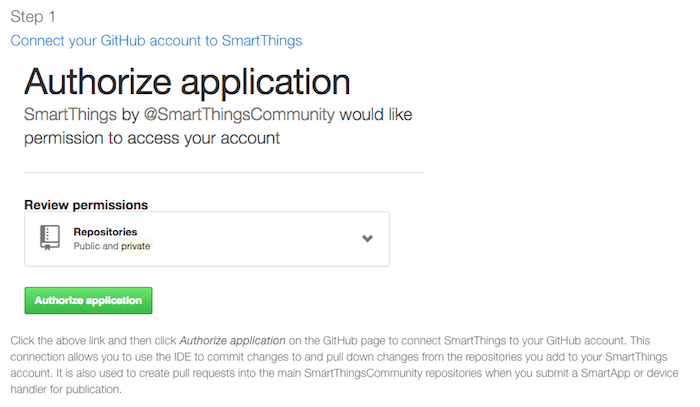
4. When prompted, enter your GitHub username and password.
5. Select “Authorize SmartThings community.”
6. When prompted, head over to the SmartThingsPublic GitHub page.

7. Find the “Fork” button and give it a click. GitHub will now create a copy of the SmartThings repository.
8. Switch back to the SmartThings IDE tab, and then click “Next.”
9. Select the “My SmartApps” tab followed by “Settings -> Add new repository.”
- In the “Owner” column, enter “ady624.”
- In the “Name” column, enter “webCoRE.”
- In the “Branch” column, type “master.”
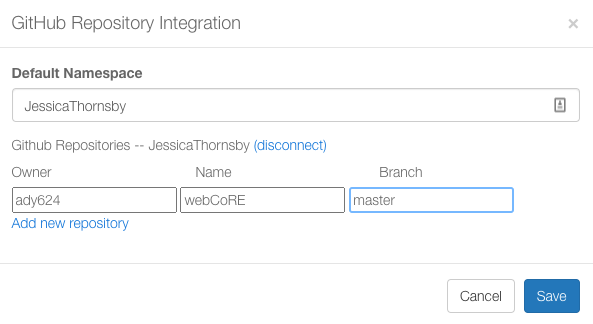
10. Once you’ve entered all this information, click “Save.”
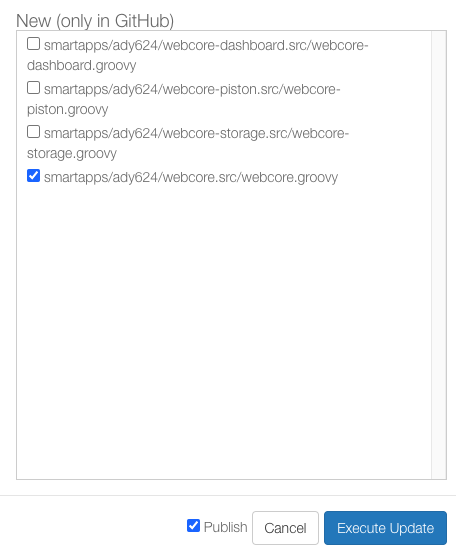
11. Select “Update From Repo -> webCoRE (master).”
12. In “New (only in GitHub),” select “webCore.groovy.”

13. In the bottom-right corner, select the “Publish” checkbox.
14. Click the “Execute Update” button.
15. Select “Update From Repo -> webCoRE (master).”
16. In the “New (only in GitHub)” box, select all three of the following checkboxes: “webCoRE Piston.groovy,” “webCoRE Storage.groovy,” and “webCoRE Dashboard.groovy.”
17. Select the “Publish” checkbox, and then click “Execute Update.”
The SmartThings IDE will now refresh. Once it updates, you should have access to all of the webCoRE components.
Enabling OAuth for webCoRE
At this point, you’ve setup GitHub integration and have access to all of the webCoRE software, but you still need to enable OAuth before actually using any of the webCoRE components:
1. In the SmartThings IDE, select the “My SmartApps” tab.
2. Find “ady624 : webCoRE” and click its accompanying “Edit” icon.
3. Click to expand the “OAuth” section.
4. Select the “Enable OAuth in SmartApp” button.
5. Click “Update.”
Add webCoRE to your mobile app
Next, add webCoRE to the SmartThings mobile application as a SmartApp. Note that in this section the SmartThings Classic app is used.
1. Launch the SmartThings mobile app.
2. In the bar that runs along the bottom of the screen, tap “Automation.”
3. Tap the “SmartApps” tab.
4. Select “Add a SmartApp -> My Apps.”
5. Tap “webCoRE” (not “webCoRE Piston”) followed by “Next.”
6. Read the onscreen information, and if you accept the terms, tap “Choose a security password … ” and pick the password you’ll use to access the webCoRE Dashboard.
7. Tap “Choose how often the dashboard login expires” and select from the available options, which range from once every hour to once every three months. Tap “Next.”
8. You’ll need to select all the devices, sensors and actuators that webCoRE should have access to.
9. Once you’re happy with your selection, tap “Next -> Save.”
You’ve now successfully set up webCoRE.
Accessing the webCoRE Dashboard
To set up Dashboard access on your smartphone or tablet:
1. Launch the SmartThings Classic app.
2. Navigate to “Automations -> SmartApps.”
3. Select “webCoRE -> Dashboard.”
4. When prompted, enter your webCoRE password and then tap “Authenticate.”
Building complex home-automation rules on a smartphone or tablet isn’t always easy, so you may also want to configure Dashboard access on your laptop or computer:
5. In the SmartThings Classic mobile app, navigate to “Automations -> SmartApps -> webCoRE.”
6. Select “Register a browser.” SmartThings will now display a registration code. This code expires in three minutes and can only be used once.
7. Launch the web browser where you want to access the webCoRE Dashboard and head over to webcore.co/re.
8. Enter your code and then click “Register.”
9. When prompted, enter your webCoRE password and click “Authenticate.”
You’ll now be able to access the webCoRE Dashboard via your web browser.
Creating your first webCoRE piston
The webCoRE Dashboard is where you’ll create your home-automation rules or pistons.
To familiarize you with this process, let’s create a simple piston that’ll send a push notification to your smartphone if a door or window is opened while your home is in “Away” mode.
To use this home automation rule, you’ll need to have attached a multipurpose sensor to a door or window. Since this is a security-focused piston, you may also want to use it alongside the “Empty house” mode and “Everyone leaves” routine or with Samsung’s Smart Home Monitor.
Create the first piston:
1. In the webCoRE Dashboard, select “New Piston.”
2. In the subsequent pop-up, select “Create a blank piston.”
3. Give your piston a descriptive name and then click “Create.” You’ll now have a basic piston outline.
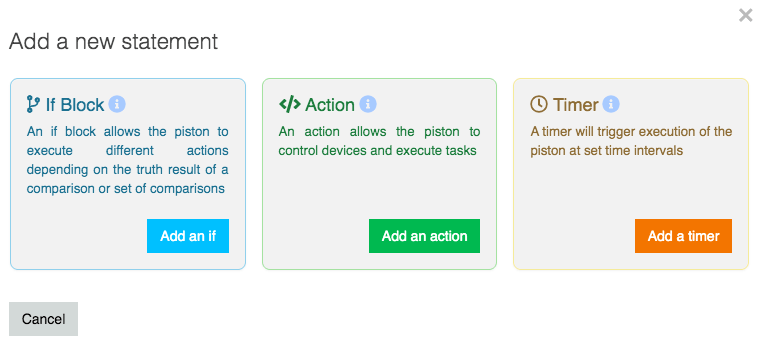
4. Click “Add a new statement.”
5. In the subsequent pop-up, select “Add an if.”
6. Select “Add a condition.”
7. In “What to compare,” open the drop-down and select “Virtual device.”
8. Open the accompanying drop-down and select “Location mode.”
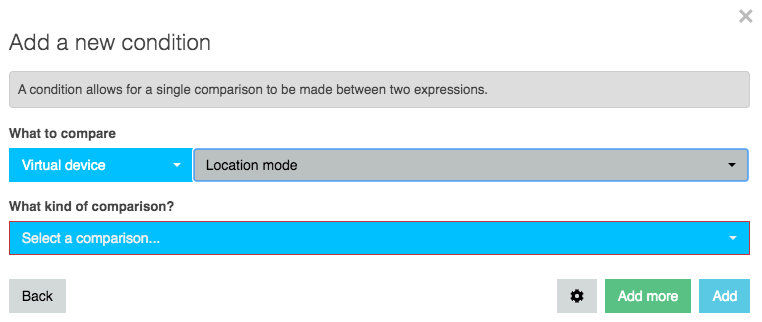
9. Open the “What kind of comparison” drop-down and select “is.”
10. Open the “Compare to” drop-down and select “Value.”
11. In the accompanying drop-down, select “Away.”
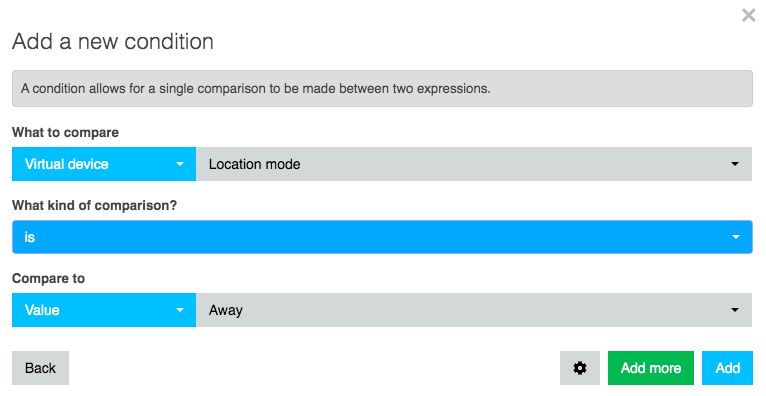
12. Click “Add.”
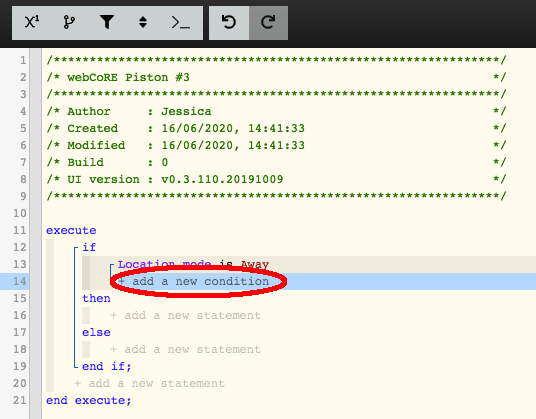
13. Back in the main script editor, click “Add a new condition.”
14. Select “Add a group.”
15. Open the “Logical operator” drop-down and select “Logical AND.”
16. Open the “Whole group negation” drop-down and select “Not negated.”
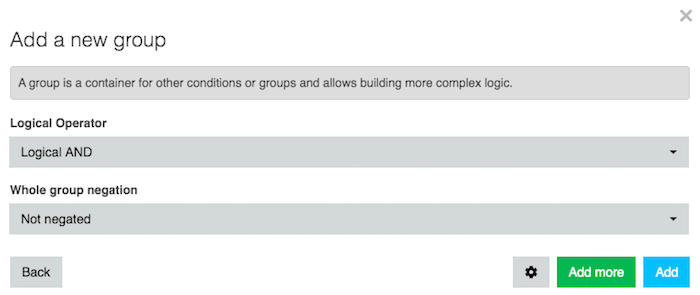
17. Click “Add.”
18. Back in the main code-editing area, select “Add a new condition.”
19. Select “Add a condition.”
20. Open the “What to compare” drop-down and select the sensor you want to monitor. For example, for this tutorial, “Conservatory door” is being monitored. Open the accompanying drop-down menu and then select “contact.”
21. Open the “What kind of comparison” drop-down and select “changes to.”
22. Open the “Compare to” drop-down menus and choose “Value: Open.”
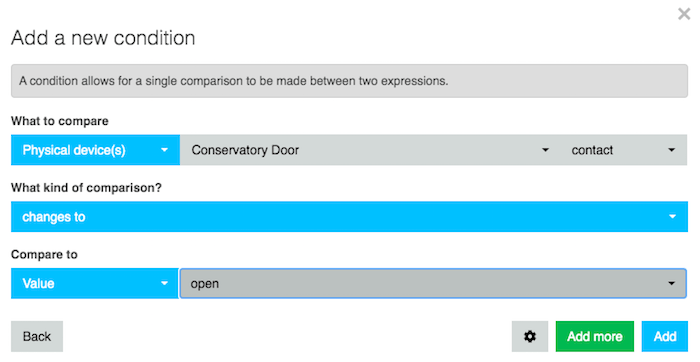
23. Click “Add.”
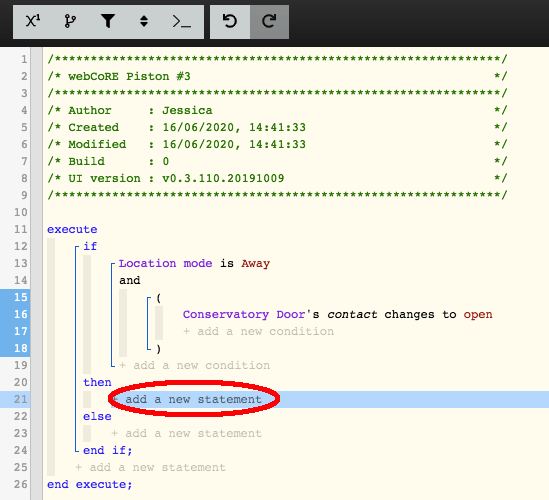
24. Back in the main code-editing area, move to the “then” section and click “add a new statement.”
25. In the subsequent window, select “Add an action.”
26. Open the “Devices” drop-down and select “Location.”
27. Click “Add a task.”
28. Open the “Do” drop-down and select “Send SMS notification.”
29. Open the “Message” drop-down and select “Value.” You can now enter the text that you want to include in your SMS.
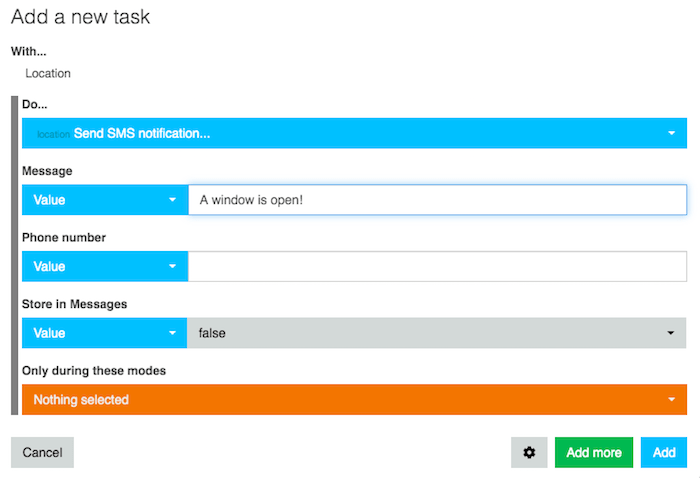
30. In “Phone Number,” enter the number where you want to receive your smartphone notification.
31. Click “Add.”
You can now save and activate your piston by clicking “Save.”
Now every time this window or door opens while your home is in “Away” mode, you’ll receive a notification on your smartphone.
Conclusion
webCoRE is an incredibly flexible and customizable tool that you can use to create pretty much any home-automation rule, so it’s well worth spending some time exploring the Dashboard to get a feel for the different kinds of pistons that you can create.
Alternatively, you may want to spend some time browsing the vast collection of example pistons contributed by the webCoRE community.
Do you have any ideas for unique and interesting webCoRE pistons? Let us know how you plan to use webCoRE in the comments below!


