
A smoke and gas detector alarm is essential in designing a modern smart home. Their main objective is to detect potential fires, and ensure real time monitoring of indoor environment gases such as carbon monoxide (CO), LP gas, propane, alcohol, methane, and more. If you have access to an Arduino Uno board, you can tweak it to design your own homemade smoke detector.
Adding a simple MQ2 gas detecting sensor module to the project makes it a combined smoke + gas detector device. Just using a few easy steps, you can perform safety monitoring as well harmful gas detection. Below we present a simple project description of an Arduino Uno device being used in this manner.
Components Required for Arduino Uno Smoke Detector Project
The following components are required in this project. There are a few more variations in this so we will be covering other possibilities for a holistic overview.
- Arduino Uno R3 Board: a standard Arduino Uno R3 board with 14 digital input/output pins, and a removable, dual-inline-package (DIP) ATmega328 AVR microcontroller. The ATmega328 package consists of twenty-eight ATMega328P IC pins which will hold the connections in place through tight hook-ups. This way no breadboard is needed as the ATmega328 directly connects to the MQ2 sensor module.
- MQ2 sensor module: MQ2 gas sensor module is part of a family of gas detecting sensors known as “chemiresistors”. Without going into detail, it’s sufficient to understand that MQ2 detects gases such as LP gas, methane, propane, alcohol, smoke, carbon monoxide, and much more. This is done using an analog voltage measurement at pin A0 (shown below). The output values change according to the level of the gas or smoke present in the surroundings. Therefore, this output voltage is proportional to the smoke/gas in the air.
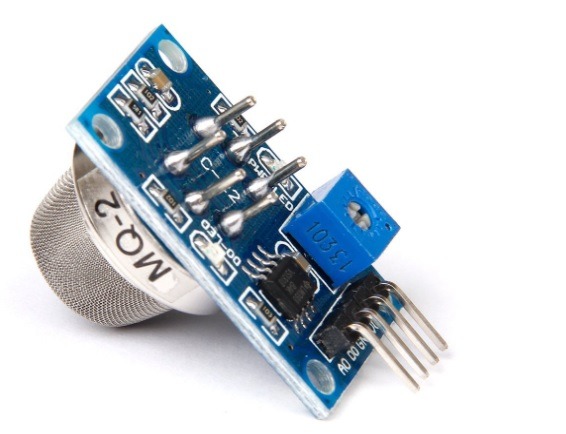
As shown in figure, the MQ2 sensor module further comes with a built-in potentiometer and high precision comparator. The potentiometer can be used to adjust the sensitivity of gas sensor. There are four pins in total one after another: A0 (Analog output), D0 (Digital output), GND (Ground) and VCC (Voltage common Collector). The VCC and GND are for power connection to the Arduino module.
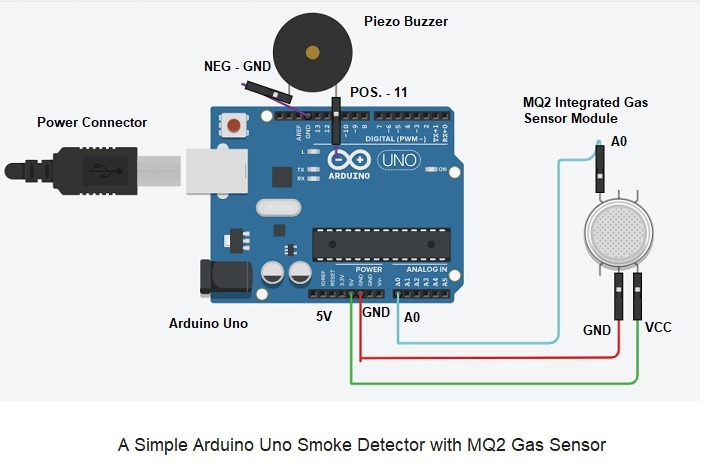
- Piezo buzzer: to confirm the presence of smoke, a tone will be generated using a 5V Piezo buzzer. It has a positive and a negative leg. The positive end will go into the Pin 11 of Arduino Uno board, and the negative will go into its GND.

- Connecting wires: instead of plain wires which go through a breadboard, we would require hook-up wires with clips which can attach easily to the MQ2 module as well as ATmega328 connectors.
- LED lights: if your project involves a buzzer as well as a visual display warning, then you need LED lights to be installed into the Arduino Uno board.

- Arduino IDE: download and install the latest stable version of Arduino IDE from this link. It currently supports Windows, Mac, and Linux.
Procedure
To start assembling the various physical components, keep the following rules in mind:
- Power connections essential: First, connect VCC of MQ2 gas sensor module to 5 V pin of Arduino. And GND of sensor to GND of Arduino.
- Connect analog pins: Afterwards, connect the analog pin of MQ2 gas sensor module to A0 pin of Arduino Uno board. Basically, Smoke A0 pin is the input pin.
- Connect buzzer to Arduino Uno: Finally, connect positive terminal of the buzzer to Pin 11 of Arduino, and negative terminal to GND of Arduino. This means buzzer pin is the output pin.
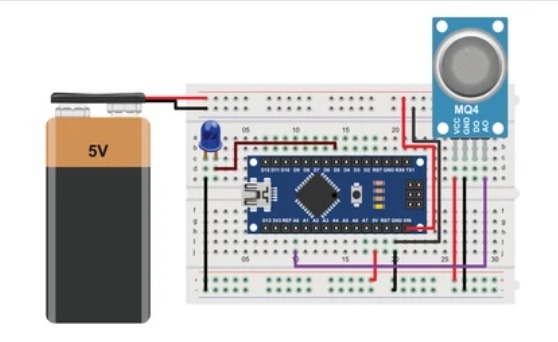
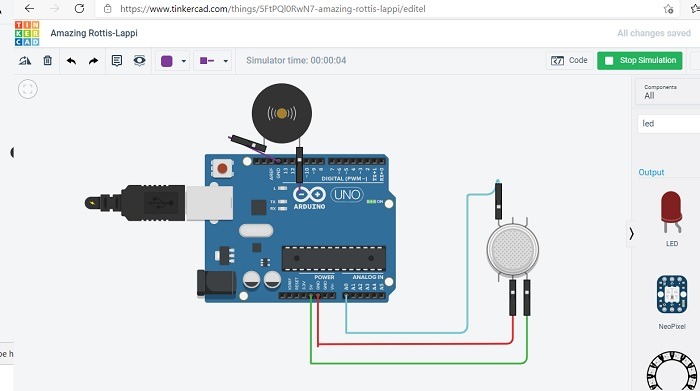
Result Diagram (Pinout)
The above arrangement can be seen in the circuit diagram shown below. It should be noted that if Piezo buzzer is connecting to pin 11 of Arduino, the same should reflect in the final code assembly. If LED lights are to be added through a breadboard as shown in this example at Arduino Project Hub, then the pin numbers should be noted. The following design is simple, and does not require any breadboards.
In our case, analog voltage is strictly based on the intensity of the gas. Our aim is to read the sensor output (which is analog voltage) and when it’s at a certain level, the buzzer will make a sound.
Code and Validation
The following code is to be used in the above circuit comprising only the buzzer, alog with no LEDs. Smoke A0 pin is declared as input pin, and buzzer pin is declared as output pin. We will basically be reading he input and storing it as a value called “sensorvalue”. If this value is more than 320, a tone will be sent as a command to the buzzer. This helps us with confirming the results.
int smokeA0 = A0; // analog pin value is input
int buzzer = 11; // buzzer pin value is output
 float sensorValue; //Defined Variable used to read pin A0 which is then stored as sensor value
 void setup ()
{
pinMode (buzzer, OUTPUT);
pinMode (smokeA0; INPUT);
Serial.begin(9600); //Sets the serial port to 9600
Serial.println("Gas sensor is giving you a warning now");
delay(1800); //Allows the MQ2 Sensor some time to react
noTone(buzzer);
}
 void loop()
{
sensorValue = analogRead(smokeA0); // read analog pin A0
 Serial.print("Sensor Value: ");
Serial.print(sensorValue);
 if(sensorValue >320)
{
Serial.print{" | Smoke has been detected");
tone(buzzer,1000,200);
}
else {
noTone(buzzer);
}
Serial.println("");
delay(200); //wait for finish
}
To gain an understanding of various code parameters, refer our cheatsheet for Arduino IDE commands. Whenever there is a tone, an alert will be sounded on the buzzer. At the same time, when the threshold value is not reached, the buzzer will not be using any tone. This way you can detect the presence of smoke in the house and various gaseous compounds as well.

The output sensor values will react and let you know if smoke is present within the room. Keep track of the tone and no tone values as they have to be adjusted to get proper reading based on the delay in response.

For validating your results, you can use an online simulator such as this one by Tinkercad which is very sophisticated in getting best desired results. When the stimulation starts, you will notice a buzzer sound (below) corresponding to the simulated presence of smoke and gas in the surroundings.
Conclusion
Smoke and gas detection is indeed a very common project with Arduino. But it also has several real-world applications. There are sophisticated smoke and gas detectors in the market, such as this one by SAAM Inc. It not only measures fire smoke but many other things including mustard gas, PM 2.5, PM 10, and smoke emitted by synthetic building materials, such as polyurethane, which are characterized by slow-burning or smoldering fires. Therefore, it’s a fact that compared to the limited scope of our project, an industrial-scale smoke and gas detection solution is far more capable.
The various aspects of indoor air quality monitoring have spun a huge market of wellness IoT products which address the demand for clean air in a home or office through effective smoke and gas monitoring. There are fire alert monitors by companies such as Dryad, with its main applications including prevention of wildfires. It is obvious that to scale your project to that level, you cannot depend on Arduino boards as the requirements are on a more industrial scale. That is where more rugged and capable boards come into the picture.
Get the best of IoT Tech Trends delivered right to your inbox!


